Featured Post

Click Here to See All Our Shop Links!

Saturday, November 7, 2020

Pancakes for the Busy Mom


Ok, so I am not a morning person. I also hate cooking when I'm half asleep and hungry. I hate letting food go to wast too. So I have started making baked waffles then storing them for later.  I say baked because I don't have a waffle maker, but I have a waffle sheet pan (thank you, Pampered Chef). I make waffles at night before going to bed, stick them in the fridge, and all the kids have to do is help themselves while I enjoy my morning coffee in peace. Now, I'm not one of those fancy moms that make them from scratch; I keep it simple. I used pancake mix (follow the recipe on the box), extra vanilla,  and whatever fruit I just so happen to have that's about ready to expire. It's simple, it's yummy, and I can secretly give my kids fruit that they swear they never liked, although I watched them eat it a few days ago.

Now you don't have to use a waffle pan. You can make these in a waffle iron or other shaped baking pans. (I currently have another Pampered Chef summer-themed backing pan on its way). Don't think you have to buy the overpriced pampered chef stuff. I have a Pampered Chef addiction and a shopping problem.

Now to the pancakes. I love this recipe because it is excellent for a busy mom like me. It helps save money because, let's face it, those freezer waffles are thin. The kids go through them way too fast for the price, unlike the homemade ones. The homemade ones are something the kids can feed themselves without help. The kids fill them up better off of them. Plus, pancake mix is super cheap, and you can mix almost any fruit into it. Which, for me, makes it the perfect breakfast item. 

First, you start with whatever brand of pancake mix you like and follow the recipe on the back of the box, substituting any ingredients you may need to. However, before adding the milk, put it in a blender or food processor with any fruit you may want to add. (Use your judgment. Different fruit means different amounts. Just make sure the fruit milk mix is still runny). Next, mix all your ingredients until it is smooth.
If you are baking, set your over to 350 and let it heat up while you fill your molds. I fill mine about 1/2 to 2/3 full. When the oven is heated, put it in for 10 min and keep an eye on it. Depending on the pan you are using, how much batter is in the pan, and other things, cook times can vary. If you are using a waffle maker, you will have to do whatever the manufacturer suggests because I do not have a waffle maker, and I have not used one in years.

Try not to open the oven too much while cooking because it slow the cooking time down. I was also told it would release too much moisture from the oven, making what you bake dry and crack. When you think the pancakes are done, pull them out of the oven. They should be golden brown, and a butter knife or toothpick can be stuck in the center and come out clean. 

When the pancakes are done, you can put sugar or any other topping on top and enjoy unless you are like me and are making them for late. You can out in the fridge, bread box, or even freeze. It just depends on how long you plan on waiting to eat them. To reheat, you can do it in the oven or even in a skillet with some butter. The toaster works great, too, depending on the pancake's shape and size. We have even taken them camping and reheated them over a campfire in a basket steamer! 


Like always thanks for reading my blog! If you like it please help support my blog and my family by shopping at my ETSY (Click Here) or my teachers pay teachers shop (Click here). 

Saturday, October 3, 2020

Apple Cider Vinegar and Toenail Fungus


I'm sure many of use (Exspeashly if you are reading this entry) have notices that their toenails have started to change color, thicken, or maybe even crack. If this is so you may have toenail fungus. If so it is ok, do not freak out because in your kitchen you may have one of the best and cheapest ways to heal your poor toes. Apple cider vinegar (ACV) is a great remedy for toenail fungus, foot smell, and it will also soften the skin of your feet (and any other body part you use it on). so let's talk about why this is.

(Disclaimer: before we go any further I do want to note that I am not a dr. and with some of these claims I have not found any credible study proving that they help, only my own personal use, research, and old wives tales that have been passed down from my community. So I suggest you talk to your health care provider before trying this, or if you do not get the desired results)

Why It Works

So let's talk about ACV and how it helps with foot fungus and smell. The idea behind why it is said to work is simple, Vinegar is an acid, which gives it antifungal and antibacterial properties. This in theory should slow down the growth of fungus and bacteria. (So you could even use it as a deodorant in a pinch since armpit smell is caused by bacteria mixed with sweat)  Not only that but it will also affect the pH levels of the skin making it harder for the fungus to grow and spread. 


As I said earlier it will also soften the skin. (So yes you can use this on your face as well I do it all the time). ACV considered an alpha hydroxy acid which will help chemically exfoliate your skin by removing dead skin buildup. So don't be scared to use it on other parts of your body (after doing a little research of course) that way you can show off that nice new soft healthy skin.   

Organic ACV vs Non-organic ACV

So the big difference between the two types of ACV is non-organic is pasteurized, filtered, and has had man-made pesticides used on the products that are used to make it. (I use the word man-made pesticides because many people believe organic has no pesticides use when that is not always the case, some organic farmers do use natural pesticides) while the organic one is not. Since organic ACV is unfiltered and unpasteurized it still has the live bacteria and yeast used to ferment the apples in it. Now when it comes to foot soaks I do not really think it matters if the ACV is organic or not (Some people will tell you otherwise though) since the main thing we want it for is the acidic property. Now I do use organic in my household but in the case of foot soak it just because of personal health beliefs not because I think one kills foot fungus better than the other. 


How to Use it to Kill Foot Fungus

So ACV is pretty easy to use to get rid of foot fungus. All you have to do is just get a foot tub of warm water (I use one of the plastic sponge bathtubs you get from the hospital) Then I add a splash of ACV to it and just soak my feet for 15 to 20 min at least once a day. ( you should really do it twice a day for foot and toenail fungus but let's face it when you have kids, you don't always get the time to do something twice a day). 

Like always thanks for reading and please help support my family and me by following our Instagram Retro Girl Worksheets or finding one of your online shops. You can get cool clipart by clicking here to go to my teacher pay teacher shop. You can also check out my ETSY shop by clicking here.


Tuesday, September 8, 2020

Welcome to the New Home Schoolers!


So it is that time again! We have officially started our homeschool year! Well really haven't stopped homeschool, but now that it is getting close to the no one wants to be outside weather we are switching back to a more classic style of homeschool. The kind that has a lot of icky books, and paperwork tracking. For use this is normal, Having a very hands-on type of learning when the weather is nice and a more structured classic style of learning when the weather turns bad. However, for all the new homeschoolers joining in on the fun it the idea of homeschooling is not normal and kind of stressful for many people. So, I want to say welcome and hopefully give you some helpful tips and encouraging words.

So first take it slow.
This is the most important part of homeschool! Take it slow and enjoy the time you now have with your kids. If this the first year home school it will take everyone a minute or two to get on the same page (heck we are on year 3 and it still takes us a bit to get things rolling smoothly when we first change to a more structured learning style). Just remember that the important thing is that your child understands the content, not how much content they can get threw. Don't understand a math concept? That ok we will just stay here for a few more days working on it. Struggling with history or even better, found a super cool history topic the kids want to learn more about? Great! Find more stuff for it!

Don't be afraid to scrap curricula!
I have had to do this several times! (Mostly with science). The first year was the worse, we hated some of the curricula that we thought would be cool and for some crazy reason we suffered threw it! Then when year 2 hit it was like I snapped and if it didn't work I threw it out! Remember don't keep using something over and over again if it not working that is just the definition of insanity!

Don't let anyone make you think you can't
So this is my last and most important one. Do not let anyone make you think you cannot school your children. This to me is the most important after some negative comments were given to me from my old high school guidance counselor who ended up becoming the principle of the school my daughter would have went too. Regardless of what anyone has told you, will tell you, or even says behind your back those are your child and you know what's best for them. If you think you can and feel homeschool is right for you then do it!

With that being said I hope this post is encouraging and helpful to some. I also hope that those that need to hear these words do! And as always I have to promote so make sure to check out all my shops! 

To buy Earring from my ETSY click here

Need clipart or educational supply Click Here!

Sunday, September 6, 2020

Click Here to See All Our Shop Links!

 Make sure you check out all of our products!


Buy Jewelry and other craft items at my ETSY shop!

Click here!


Needing education products? The check out my Teacher pays teachers account! 

Click here!

Wednesday, June 17, 2020

Summer Activities that support Social Distancing

So summertime is normally a time people travel, spend time with family, and try and do fun things. Unfortunately, this summer that isn't as easy as it usually is. With COVID 19 keeping many people at home and many states "closed" it makes it hard to decide what to do. Even the place that we're open seems to be closing again thanks to spikes in COVID cases. Due to all this, I have come up with a list of safe ideas to do over the summer!
(the baby and my sister enjoying the fresh strawberries)
Pick Fresh Fruit
This one is first because it is my favorite. We went to our local farm and picked strawberry. It was great for the kids (when I say kids I mean the baby and my 14-year-old sister. Lilly is currently spending time with her dad and won't be back for 3 weeks). Strawberry is not the only fruit that can be picked either. We have picked BlackBerry, raspberry, blueberry, and apples. 
As for the social distancing part, that wAs super easy most field for picking our fruit is huge! So it really easy to spread out and get away from others, while your kids run off some of the built-up energy they have. I do suggest going early in the morning as well just because it can get hot picking out their!
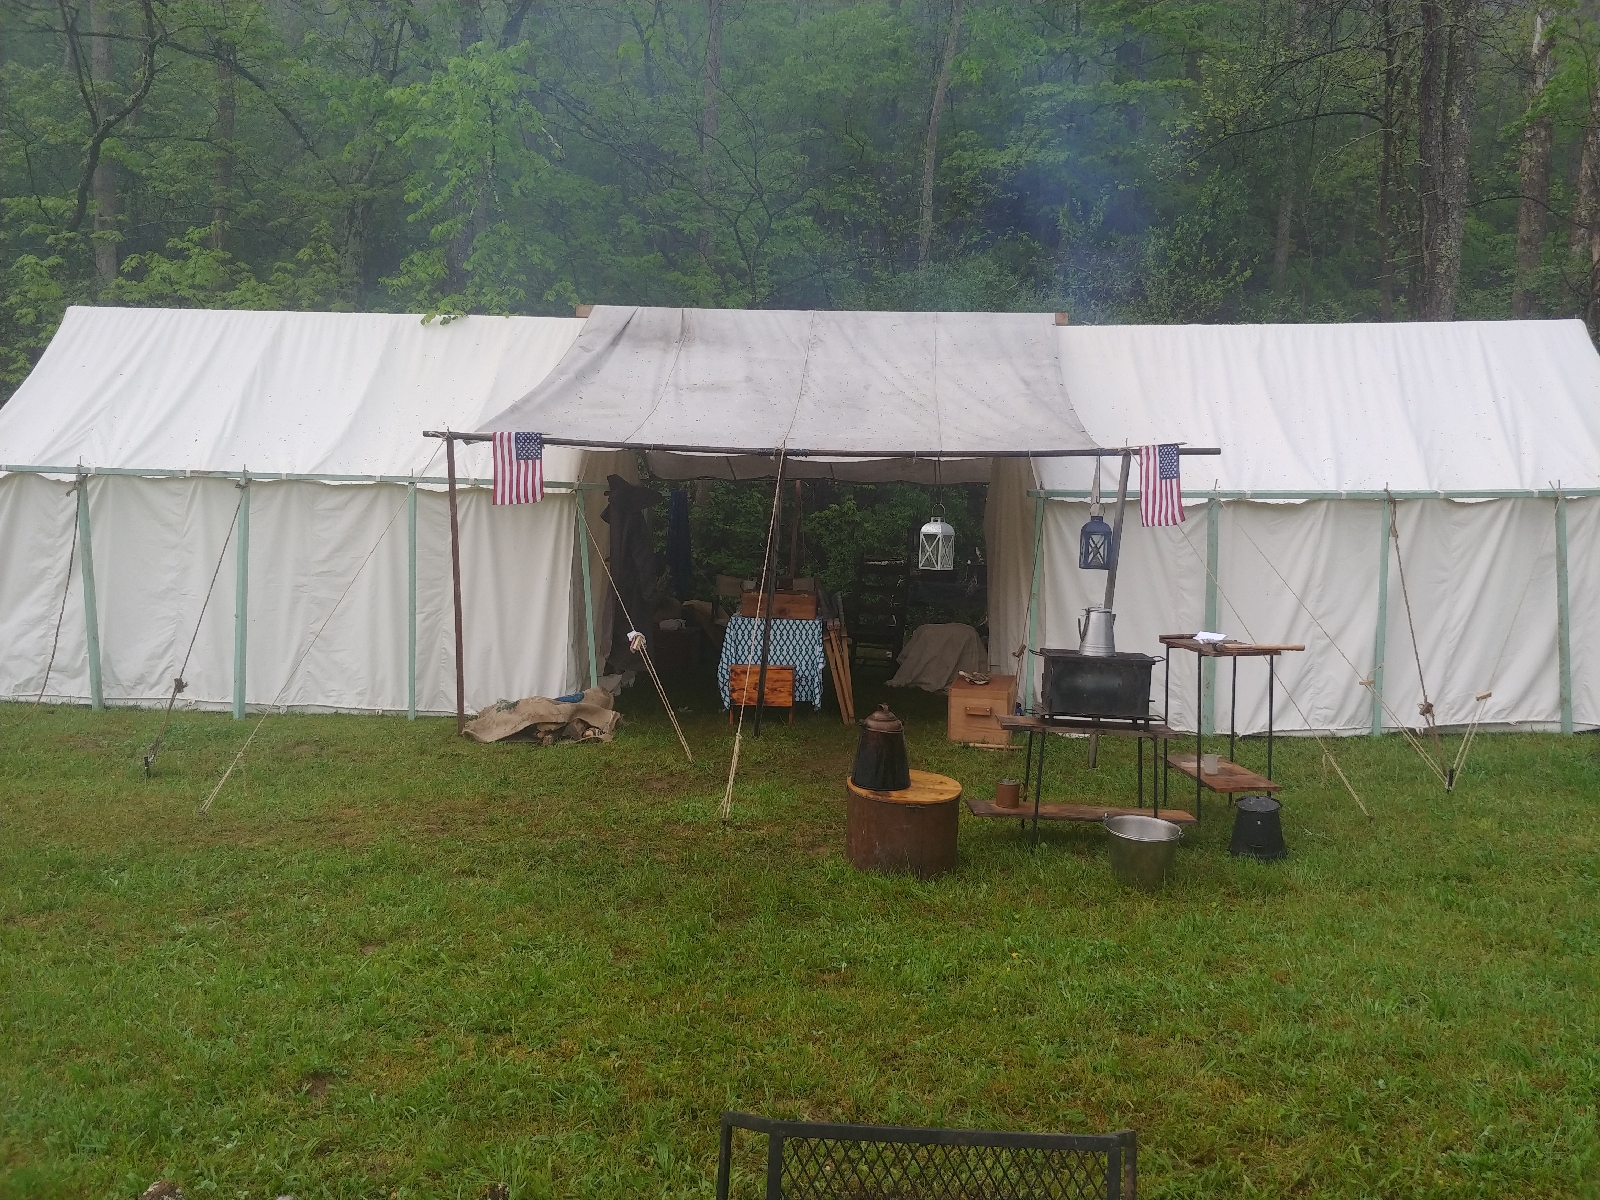
(our camp site, it is a primitive 1800 style camp, but you don't have to camp like us! Camper, back yard tent, or a blanket tent in the living room we don't care as long as you have fun!)

Camping
Camping is Another great thing to do that if set up in the right location can be fun and keep you away from others. I did a short entry about our camping trip, and when we went, we had no problem staying away from others. This would be a great time to look into that since I am hearing talking of the National parks opening up soon as well! Just make sure you take proper safety precautions while you and the kids are out in the woods!

Virtual Vacation
Not in a location that offers a lot of outdoor activities or just doesn't like the outdoors? That is ok there are still things you can do safely. Many place are offering virtual tours from around the world, or you cAn even use google maps to help you explore other counts from the comfort of your couch! 

Day Trips
 
If you happen to be lucky and are in a more open state now would be a good time to look into day trips and fun things close to you. I would just suggest  you avoid anything indoor though, it may make social distancing hard. (But check out the indoor activities web site if they have one though. Many placing are doing a good job at making it so you can still enjoy your indoor activity while keeping it a low-risk environment but low-risk do not mean no risk. If you feel comfortable and safe then help local places out and visit them!)

(baby and dad enjoying a book at our at home cation)
At Home-cation

of course the safest thing is to stay home. I know a lot of people are getting tired of hearing this but it is true. Stay in, pop some popcorn, and watch a movie. You can even buy a small pool, and set your yard up like one of my friend did to look like the Hawaiian Islands for there at home cation. The possibility are endless with this option!

Like always I hope you enjoyed reading and keep coming back to read more. Don't forget to find and support us on our social media handles, (Instagram: Retro Girl Worksheets, Twitter: Retro Girl's Treehouse, and podbean: Retro Girl's Treehouse.) 

Wednesday, June 10, 2020

Summer Reading

Before I get too far into anything I want to say sorry for being quiet and not posting. The fun camping trip we took Memorial Day weekend turned out to not be so fun. While there I happen to get into some deer ticks.
Well, the one that I happen to get into was carrying Lyme Disease. Which would be the 2nd time I have had it. Let me just say that having it a 2nd time was much worse than the first time. We also will not be camping at the location again because that same location is where I happen to get it the first time.

Now with that being said let's talk about summer reading!

So many homeschoolers seem to love the library and the summer reading programs many of them offer. Sadly many libraries will now be able to have them due to all the restrictions. So for my family, I have decided to create my own. Which was actually really easy.

So you can do this in power point if you like, but just make a guide with how ever mine spaces you wish for your child to complete said task. (We have 3 different ones, on for extra chorus, one for reading, and one for summer time worksheets/activity books). If you want to get real crafty with it you can even use different fonts, clipart, and colors too. 

We also found these cool stickers that you can color which we got form a local store. (I'm sure with a quick search on Amazon you could find then there as well). I also made my own clipart for the top of the page so after the sheet is filled it is now one big coloring sheet! 

So after the sheet is filled with stickers Lilly gets a reward for filling it up like she would at the library. Normally it is something like a trip to the ice cream shop, or Starbucks for a cake pop. Normally, it to go get something she likes to do but dosnt happen to often. 

That about it for now, but if you're not able to create your own sheet please follow my teacher pay teachers shop by clicking here. This way you will get updates to clip art, worksheets, and at some point unit study for your homeschool!

Friday, May 29, 2020

Educational Camping

So first let me start with I am sorry for the lack of post. The downside to everything being shut down is we are not doing as many cool homeschool things as we normally do this time of year so I, unfortunately, do not have a lot to talk about on here.

Now with that things in West Virginia are starting to open up which means our yearly Memorial Day camping trip and rifle shoot were able to happen. Which the kids were very happy about. Though I will admit there are not as many people here for it as they normally are. Although, it did make social distancing easy, even if the normal amount of people showed up it would still be easy to social distance. We actually are finding out that in the right location camping is actually a good vacation to have and still be able to social distance from everyone. So we will most likely go camping again as more things open up.

(mine and my parents wall tent)

Now with that being said, the camping we do is not like the camping lots of other people do. We camp like we are living in 1600-1800. So not only are the kids having fun, but they are getting a great history lesson in as well. Which is great because it saves me a week of planning and research. Not only that but because they also are learning things hands-on while having fun they tend to remember what they are learning a little better. 

Not only do they get to learn about history while doing this but they get to take part in some awesome activity that they normally wouldn't. Like throwing a tomahawk and knife, shooting archery and some events even offer shooting rifles for younger children. They can even win prizes as they get older for taking part in this activity while camping.

(lilly learning how to safely throw a hack and knife)

Not only are they learning new things but these events attract people from all over the place, even people from outside the use. So they get to meet interesting people and learn about how other people act, as well as tolerance for social differences. 

These type of reenactment travel all over the place as well. If you are interested in taking part in it, or just going for a visit you can learn more here.

So if you click the here link it will take you to a Google search that  give you links to several of the larger events that happen threw out the year.

As always I hope you enjoyed reading my blog. If you like this please make sure that you find my podcast as well. You can listen to it by clicking this link here. Also if you are a homeschool or parent in need of worksheets, or clipart please make sure you check on my Teachers pay teachers store by clicking here


Tuesday, May 5, 2020

Home Grown Mushrooms

First off I want to say, sorry for no post last week and the late post this week. For some reason, I had been in a bit of a funk and needed to take a bit of time to myself to work on other projects. I also wanted to take time away from my blog because it was starting to turn into a job and not something fun anymore.

I know that sounds odd since this is a new blog but as a homeschool mom, I am actually really busy this time of year. Though it isn't really the homeschool that has made me busy since we are wrapping up our normal curriculum and getting ready to switch over to our summer curriculum. (Which is a little easier and more just reviewing what we learned so we don't forget stuff). But with summer comes a lot of extra tasks. Making my blog seem more like a job that I needed to make time for then something fun.

So with that being said, now it is time to talk about a really cool project we have been working on the past few weeks. That project is growing mushrooms. Mushrooms are one of the few healthy foods I do not have to fight my 6-year-old to eat. So what way could we make her favorite food even better? We let her grow her own!

( My oldest with her mushrooms)

I found this kit by mistake at Lowe's when I was looking for seeds for our garden adventurous (which if anyone read my post about that it is not going well). It was tucked in the back behind a lot of newer looking guarding stuff which made me wonder if it was worth spending money on. However, it was on sale and I have a bad habit of justifying my purchases if they are marked down 50% or more. So I got it. 

So these kits I normally stay away from because they are overpriced, a lot of the time they don't work for me, and my kids normally start them but then quite halfway threw due to a number of reasons them making them my projects. (Thanks to this anytime my kids start something they are now made to finish it but do not have to get any more of that project and the project must be age-appropriate). However, this was was pretty easy so my 6-year-old had no problem doing most of the project by herself.

So to begin with we opened the box and soaked the compacted dirt in water overnight according to the instructions. Then after that, it was as simple as putting it in the box and just remind my 6-year-old to spry the dirt twice a day. (For younger kids I would suggest getting a spray bottle with a trigger. The one the kit has is a push top spray bottle and was a little hard for my 6-year-olds little hands to use but she smaller than most kids her age). Then in about two weeks, we had fully grown mushrooms that we could eat!

(our fully grown mushrooms)

One of the things I really liked about this kit is it comes with a flyer that teaches you about mushrooms. So we were able to use the whole thing as our science for a bit. We learned how to observe changes in things, we learned about different mushrooms, and we also learned how to take responsibility for something. Which are all things I can get behind. Another good thing about this kit is if you go to their web site and share your picture with the fully grown mushrooms the company donates a kit to different things. (Places that grow food for others, and looked like schools as well according to the comment from the company). 

The only down side I found to the kit is it did cost a bit. On the Back to Roots website the kit is 25.00 (that does not include shipping or taxes) when it seemed like many local stores like Lowe's, and Ace Hardware had the kits for a lot less. So if this is something you are interested in I would check your local stores to see if they have the kit in stock first before getting it from Back to the Roots if you are wanting to save some money.

So I hope this is something many other homeschool family can find a way to add into their home school. If you have any other ideas you would like to share please do so in the comments. Don't forget to find us on Instagram at Retro Girl Worksheets. Also check out my TPT shop Retro Girl Worksheets for some cool clip art, coloring pages, and supplemental worksheets. We also have a podcast on podbean called Retro Girl's Treehouse but it is not as family friendly as my blog. (Just warning anyone before the go out and find it!)

Tuesday, April 21, 2020

Dandelion Jelly

So apparently those lovely little yellow weeds called dandelion can have many uses. After doing some research I found out that during the great depression many people ate dandelion greens (the green part of the dandelion) to help supplement some nutritional needs that couldn't get due to lack of food. 


I also found out thanks to a friend that you can batter and fry the top of dandelions and eat them as well. She said it was similar to how you would pan-fry mushrooms. Not only that but the internet had tones of other recipes that could be used to batter and fry them as well.

As for myself, I decided to go with turning them into jelly. It was a long but easy process that any well-seasoned canner should be able to do with ease. However, I am not a well-seasoned canner. Thank God my mom is!

So to start off your going to want to send your kids out to pick dandelions. (It's ok don't feel bad they like picking those weeds anyway and blowing the seeds all over the place while they do it). Now, keep in mind that the area you pick in isn't so close to a road, an area where pets use the bathroom, or any type of pesticide or fertilizer has been used. No one wants to eat that stuff. 

After your kids pick you dandelions (make sure they got enough to have at least 2 cups worth of petals) you must harvest the petals. It's a really simple process, you gently pull the petals and little bit of greenback, take some scissor and cut just enough of the bottom off the whole top of the flower falls apart in your hand. After that remove as much of the green as you can. If not your jelly could turn out bitter. (I have never tested this put many people say the green makes the jelly bitter). 
After you get two cups of petals you take 4 cups of boiling water and pour it over the petals in a container with a lid or some type of cover. Once cool put the container into the frigid and let sit 24 hours. (After making this a few times now I would suggest doing 4 and 1/4 cup water. We found that after the overnight step we were always short some tea. The shortness did not affect the process other than the amount of jelly we had though)


When petals have seeped for 24 hours it is time to get your canning pot and jar read. While they are in the sanitizing bath you can start the jelly making process. You take at 3 and 1/4 to 4 cup of the tea you made (note: the tea will have a grass smell to it but it will go away after you cook it) and put in a pot with 2 tablespoons of lemon juice, (so half to the whole lemon depending on the size) and one pouch of pectin powder and bring to a boil. As soon as it starts to boil add 4 cups of sugar (note: this jelly is very sweet, now I have not tried it yet, but if you do not like very sweet jelly you may won't cut back on the sugar). Stir well and let return to boil. Let it boil for 1 to 2 minutes. 

When the jelly is done cooking it is time to put it in the jars. Once all jars are filled and lids put on put them in a canning bath and let boil for 10 minutes (Or according to your altitudes). When 10 minutes up pull the jars out and let cool. (I like to let them cool overnight). After that enjoy. We really like ours on beer bread. N

Thank you for reading and make sure to follow us on Instagram @retrogirlworksheets. Make sure to follow our blog and find out the podcast on Podbean under the name Retro Girls Treehouse. 

Tuesday, April 14, 2020

Social Distancing Easter Egg Hunt

Ok, so I am pretty sure I should have talked about this before Easter but I didn't. Hopefully, if anyone reads this it can help them come up with some ideas so do in their home town or with their kids. 

So if you read my last blog post you would know that I am currently staying with my parents in West Virginia tell all the shelter in place orders calm down. If you didn't well now you know! The nice thing about this state is they try to help each other out. A lot of patents are now stuck at home with kids who have a way to much energy, icky weather, and parents who are not used to spending this much time with their kids. So our local boys and girls club put on a social distancing Easter Egg Hunt.

They did this by printing out pictures of eggs and placed them all out the county that we live in. Then they gave so many hints to find the eggs. When you found an egg you had to take a picture (also known as a selfy) with the egg. There were 50 eggs in total hidden all over the place.

As for the social distancing part, and safety. The rule was you could not touch the egg when you found it. You Also could no search in a group larger than 5, and the group you searched with had to be people you lived with. (Cool thing about a small town is everyone knows who you live with so these rules were easy to enforce). They also recommended proper hand washing before and after searching, using hand sanitizer, and to remember not to touch your face. All egg we're hidden outside and spaced far enough from each other you did not have to worry about large groups of people gathering.
(photo of my daughter and my sister with one of the eggs)

They gave everyone in town a week to find them all. Adding more hints threw the week. Depending on where you live and the rules your area has at the moment this could be a really fun activity to do. (Even after this is over it might be a fun activity for your co-op.) You do not have to make it Easter themed either. To make this an all-around activity you could just use local landmarks. (And that would cover a history lesson or two). 

If you have any other ideas of how you could make this work for you, your community, co op, or club please leave me a comment. If it is a great idea it may be featured on our podcast (Retro Girl's Treehouse on Beanpod) in May! 

Monday, April 6, 2020

Teach Your Kids to Garden

Disclaimer: I have nothing supporting anything in this post. It just my thoughts. 

(My oldest window experiment for plants)

As everyone knows most of us are stuck at home. For homeschool school it sucks! My family is used to traveling A lot. In a month we will go all over Ohio, West Virginia, Virginia, and spend a lot of time in the Washington D.C. area. Unfortunately, we can not do that right now.

So we have decided to hunker down at my parent's house. Their property is much bigger plus they have a guest house the kids and I can stay in. Not only that but there is a yard I can kick the into when they drive me nuts from having too much energy. (Plus my parents are elderly so they like having us around to go into town for them so it is a win-win).

However, even with all the space, we have here we are starting to get sick of each other. The kids are bored, I'm tired of living by my parent's rules, and my parents are tired of not being able to take naps because of all the noise. So to hopefully help with some of this I have decided that the kids and I will learn to garden.

My parents are all for this since it means fresh veggies for them, fewer trips to the (yes we know we won't have them soon but my dad hates going to the store), and hopefully worn out kids. So with this, we set out.

(me pretending to be Shredder from TMNT as the store) 

So after making a poor decision to go to the store (it was a nice day so everyone else in town decided to go to), I got some rainbow carrots, broccoli,  a bunch of other random seeds, and some seed starter. In short, all seed that turn into gross things and a bag of dirt according to my 6-year-old. 

So now here I am with a lot of pickle jars to start seeds in, gross seeds, a bag of dirt, and no idea what I am doing. With that being said, I will figure this out with the help of a six-year-old, my dad, and the internet. So now that we have our stuff the next part is clearing the land! (Aka moving the woodpile).

Hopefully, in this advantage, we will learn a useful skill, get the kids to eat better, and help our time pass faster. More to come to next week. So please find us on Instagram @retrogirlworksheets. Facebook at Retro Girl Worksheets and Twitter @rworksheets.